Ansible/Docker: Baselining Ceph on CloudLab
Written by Michael Sevilla [Updated on 02/12/17 for CloudLab clusters!]In this post we will configure and start Ceph on a cluster using Ansible and Docker. We assume that you are either using the Docker images provided by the Ceph team (Dockerhub) or you built your own images (we describe that process in Docker: Building Ceph Images) and pushed it to some registry (again we talk about that in Docker: Distributing Ceph Images).
There are many tools that deploy Ceph on a cluster. These tools format disks, set up the keyrings, set up configuration files, and start the daemons. Doing it by hand is very difficult. Most people use ceph-deploy but this installs a bunch of packages on the host machines. Instead we use Docker.
Pre-requisites: CloudLab account.
Setting Up Hardware on CloudLab
Setup your SSH keys using the Getting
Started directions on the
CloudLab website. Then deploy CloudLab nodes using the CephFS
Profile. These nodes
automatically install Docker on bootup, using our
install
script. After the nodes finish booting (i.e. their status on the CloudLab GUI
read as READY), push your SSH keys using our pushkeys.sh convenience
script. Assuming that you have your SSH keys in ~/.ssh, you can use:
~$ wget https://raw.githubusercontent.com/michaelsevilla/ceph-popper-template/master/hardware/cloudlab/pushkeys.sh
~$ chmod 750 pushkeys.sh
~$ export CLOUDLAB_NODES="<IP0> <IP1> ..."
~$ ./pushkeys.sh
[... snip ...]
DONE!
Using Ansible to Deploy Ceph
ceph-ansible is a tool that configures hardware and software for Ceph. We forked the project and made it less dependent on docker-py.
Because our lab follows the Popper Convention to make our research reproducible we save the deploy code, configurations, and benchmarks for all our experiments in a separate repository. We have a repository that helps administrators get started called ceph-popper-template. Log into the head node of the CloudLab cluster and do some setup:
~$ ssh <IP0>
~$ git clone --recursive https://github.com/michaelsevilla/ceph-popper-template.git
~$ cd ceph-popper-template/pipelines/baseline
This repository has submodules that point to ceph-ansible and our own custom roles; configuration files for our Ceph setup; and helper scripts written in bash that deploy Ceph and run the benchmarks. For more information, see the README. For more information on the “baseline” and “pipelines” terminology, read more on the Popper Convention.
Configuring your Cluster (hosts file)
Here we specify the IPs and remote users in your cluster. Ansible reads node IP
addresses from a hosts file, so edit it to describe your CloudLab cluster:
diff --git a/pipelines/baseline/hosts b/pipelines/baseline/hosts
index ab16db9..0f8cf1a 100644
--- a/pipelines/baseline/hosts
+++ b/pipelines/baseline/hosts
@@ -1,11 +1,13 @@
 [osds]
-<CHANGE ME>
+node-1 ansible_ssh_user=msevilla
+node-2 ansible_ssh_user=msevilla
+node-3 ansible_ssh_user=msevilla

 [mons]
-<CHANGE ME>
+node-0 ansible_ssh_user=msevilla

 [mdss]
-<CHANGE ME>
+node-4 ansible_ssh_user=msevilla

 [clients]
-<CHANGE ME>
+node-5 ansible_ssh_user=msevilla
Ceph Ansible requires the proper hostnames; if you are using something like CloudLab make sure that your hostnames do not the FQDN:
msevilla@node-1:~$ hostname
node-1.msevilla-qv20111.cephfs-pg0.wisc.cloudlab.us
msevilla@node-1:~$ sudo hostname node-1
msevilla@node-1:~$ hostname
node-1
Specifying the Ceph Services (ansible directory)
The ansible directory has code for deploying Ceph and its components:
msevilla@node-0:~/experiment/pipelines/baseline$ ls -alh ansible/
total 32K
drwxr-xr-x 4 msevilla cephfs-PG0 4.0K Feb 13 10:04 .
drwxr-xr-x 5 msevilla cephfs-PG0 4.0K Feb 13 10:01 ..
-rw-r--r-- 1 msevilla cephfs-PG0  286 Feb 13 00:29 ansible.cfg
-rw-r--r-- 1 msevilla cephfs-PG0 1001 Feb 13 09:57 ceph.yml
-rw-r--r-- 1 msevilla cephfs-PG0 3.0K Feb 13 00:29 cleanup.yml
drwxr-xr-x 4 msevilla cephfs-PG0 4.0K Feb 13 10:02 group_vars
-rw-r--r-- 1 msevilla cephfs-PG0  133 Feb 13 00:29 monitor.yml
drwxr-xr-x 2 msevilla cephfs-PG0 4.0K Feb 13 00:29 workloads
The *.yml files are Ansible playbooks that start and configure components:
ceph.yml starts Ceph, cleanup.yml tears Ceph down, and monitor.yml starts
daemons that monitor performance. We separate these components into different
playbooks so users can mix and match Ceph services. The workloads directory
has scrips for running the baseline benchmarks. The other files and directories
are Ansible configuration files used by the playbooks.
Users can change the ansible/ceph.yml to specify which Ceph daemons to launch in
the cluster. It uses the hosts file we set up above and is based off the
ceph-ansible site
file.
Tailoring Ceph to CloudLab (vars.yml)
High level configurations are in the vars.yml. This file is heavily
commented. For CloudLab, uncomment all blocks labeled “Uncomment for CloudLab”:
diff --git a/pipelines/baseline/vars.yml b/pipelines/baseline/vars.yml
index 7b85b19..9854801 100644
--- a/pipelines/baseline/vars.yml
+++ b/pipelines/baseline/vars.yml
@@ -24,13 +24,13 @@
 #cloudlab: false

 ## uncomment for cloudlab
-#ceph_repository: https://github.com/michaelsevilla/ceph.git
-#ceph_docker_version: a241c6f
-#ceph_docker_username: michaelsevilla
-#ceph_docker_imagename: ceph
-#ceph_wait_status: "HEALTH_OK"
-#cloudlab: true
-#kraken: false
+ceph_repository: https://github.com/michaelsevilla/ceph.git
+ceph_docker_version: a241c6f
+ceph_docker_username: michaelsevilla
+ceph_docker_imagename: ceph
+ceph_wait_status: "HEALTH_OK"
+cloudlab: true
+kraken: false

 ################
 # MON          #
@@ -45,10 +45,10 @@
 #ceph_mon_docker_subnet: 192.168.140.0/24

 ## uncomment for cloudlab
-#monitor_interface: eth3
-#ceph_mon_docker_interface: eth3
-#ceph_mon_docker_subnet: 10.10.1.1
-#public_network: 10.10.1.1/24
+monitor_interface: eth3
+ceph_mon_docker_interface: eth3
+ceph_mon_docker_subnet: 10.10.1.1
+public_network: 10.10.1.1/24

 ################
 # OSD          #
@@ -62,16 +62,16 @@
 #ceph_pgs: [8]

 ## uncomment for cloudlab
-#ceph_pgs: [64, 128]
+ceph_pgs: [64, 128]

 #<CHANGE ME> # select one of the below scenarios

 ## uncomment to use a real disk (for msevilla's cluster/cloudlab)
-#ceph_osd_docker_extra_env: "CEPH_DAEMON=OSD_CEPH_DISK_ACTIVATE"
-#ceph_osd_docker_prepare_env: "CEPH_DAEMON=OSD_CEPH_DISK_PREPARE,OSD_FORCE_ZAP=1"
-#ceph_osd_docker_devices:
-# - /dev/sdc
-#osd_data_size: 400
+ceph_osd_docker_extra_env: "CEPH_DAEMON=OSD_CEPH_DISK_ACTIVATE"
+ceph_osd_docker_prepare_env: "CEPH_DAEMON=OSD_CEPH_DISK_PREPARE,OSD_FORCE_ZAP=1"
+ceph_osd_docker_devices:
+ - /dev/sdc
+osd_data_size: 400

 ## uncomment to use a directory (for singlenode)
 #ceph_osd_docker_extra_env: "DUMMY=DUMMY"
@@ -83,7 +83,7 @@
 #mount_point: <CHANGE ME> # where CephFS should mount

 ## uncomment for all clusters
-#mount_point: "/cephfs-baseliner"
+mount_point: "/cephfs-baseliner"

 ####################
 # experiment stuff #
@@ -96,5 +96,5 @@
 #repetitions: 1

 ## uncomment for multinode (cluster/cloudlab)
-#ceph_radosbench_cmd: "rados -p cephfs_metadata bench --show-time 120 write"
-#repetitions: 3
+ceph_radosbench_cmd: "rados -p cephfs_metadata bench --show-time 120 write"
+repetitions: 3
Verify that all your changes match your cluster. In particular make sure the network and disks configurations match your cluster using:
# for *interface, ceph_mon_docker_subnet, public_network use the command:
$ ifconfig

# for ceph_osd_docker_device use the command:
$ sudo fdisk -l
We configured our cluster with 1 MDS, 3 OSDs, and 1 MON. We bumped the number of placement groups to 128, as per the Placement Group Preselection Guide.
Configuring Ceph (ansible/group_vars directory)
To configure the Ceph cluster with the variables in the Ceph configuration file
documentation,
change the Ansible group_vars/all file. We also need to specify the image we
built in the Docker: Building Ceph Images blog.
These can be specified in each configuration file for the daemon but for
simplicity we put everything in the global variable file.
Running Ceph
The run script copies the configuration files to the Ceph Ansible directory and deploys Ceph on the cluster using our Docker image.
$ ./run.sh
After Ceph finishes starting up we should see:
    cluster e9570dd8-03ad-45f0-8a74-ec9b3bb7095f
     health HEALTH_OK
     monmap e2: 1 mons at {node-0=10.10.1.1:6789/0}
            election epoch 4, quorum 0 node-0
      fsmap e5: 1/1/1 up {0=node-4=up:active}
        mgr no daemons active
     osdmap e19: 3 osds: 3 up, 3 in
            flags sortbitwise,require_jewel_osds,require_kraken_osds
      pgmap v27: 256 pgs, 2 pools, 2523 bytes data, 20 objects
            91706 MB used, 1091 GB / 1180 GB avail
                 256 active+clean
recovery io 221 B/s, 0 keys/s, 2 objects/s
  client io 1638 B/s wr, 0 op/s rd, 6 op/s wr
Great! It looks like Ceph is healthy and running.
Monitoring and Baselining Ceph
We can also use run.sh to check the health of our Ceph deployment by
benchmarking the RADOS write speed, network bandwidth, and disk bandwidth. We
also enable monitoring:
diff --git a/pipelines/baseline/run.sh b/pipelines/baseline/run.sh
index 55fda4d..7f14eeb 100755
--- a/pipelines/baseline/run.sh
+++ b/pipelines/baseline/run.sh
@@ -27,11 +27,11 @@ DOCKER="docker run -it --rm $NETW $DIRS $ANSB $CODE $WORK michaelsevilla/ansible

 rm -rf results || true
 mkdir results
-$DOCKER cleanup.yml ceph.yml
+$DOCKER cleanup.yml ceph.yml monitor.yml

 # Uncomment to run baseline
-#$DOCKER /workloads/radosbench.yml \
-#        /workloads/netbench.yml \
-#        /workloads/osdbench.yml
+$DOCKER /workloads/radosbench.yml \
+        /workloads/netbench.yml \
+        /workloads/osdbench.yml

 exit 0
Monitoring Ceph
Ceph provides the Calamari monitoring framework but when we started our work with Ceph it was not open source or production quality. We built our own framework using Docker containers. The images package the following tools:
-
Graphite: database for storing metrics, API for receiving metrics, and a GUI for visualization
-
Collectl: command line tool that monitors common server resource utilizations
-
ceph-stats: command line tool (written by us) that packages and sends Ceph performance metrics to Graphite using netcat.
All you have to do is add an IP for Graphite:
diff --git a/pipelines/baseline/hosts b/pipelines/baseline/hosts
index ab16db9..ff50ed5 100644
--- a/pipelines/baseline/hosts
+++ b/pipelines/baseline/hosts
@@ -1,11 +1,16 @@
 [clients]
<CHANGE ME>
node-0 ansible_ssh_user=msevilla
+
+[graphite]
+node-0 ansible_ssh_user=msevilla
We can add any type of monitoring services to any node using ansible/monitor.yml:
---

- hosts: graphite
  become: True
  roles:
    - monitor/graphite

- hosts: osds
  become: True
  roles:
    - monitor/collectl
These tools are configured in the same way that the Ceph daemons are
configured: with the variables in the ansible/group_vars directory. We look at
the Graphite configuration as an example:
$ cat ansible/group_vars/graphite
---
webui_port: 8082
These variables can be changed if you need to use different ports on your cluster. To understand how these variables are used we need to look at the deploy code for the service. In this case we look at the Ansible deploy code for Graphite here.
We see that WEBUI_PORT is passed into the Docker container as an environment
variable. To understand what the container does with this environment variable,
we look at the Graphite image source code; taking a peek we see that it is
launched with the entrypoint for the Docker
image
saved in the srl-roles repository. That entrypoint shows that WEBUI_PORT
is passed as a command line argument:
./bin/run-graphite-devel-server.py --port $WEBUI_PORT /opt/graphite
Welcome to the world of Ansible/Docker – things are linked all over the place and figuring out what calls what takes us on a journey that traverses multiple repositories and content hosting services. :)
Running the Baseliner
To ensure that the cluster is healthy re-run ./run.sh, which
is packaged with our experiment template repository. This runs sanity checks
inspired by the Ceph blog
post
and benchmarks RADOS write throughput, network bandwidth, and disk IO.
$ ./run.sh
If you log in to one of the Ceph OSDs we see:
:~$ docker ps
IMAGE                                       COMMAND             NAMES
michaelsevilla/collectl                     "/entrypoint.sh"    collectl
piha.soe.ucsc.edu:5000/ceph/daemon:master   "/entrypoint.sh"    issdm-0-osd-devsde
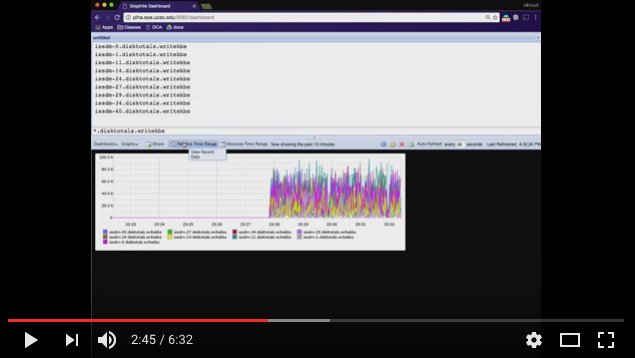
While it is running, we can explore the different metrics using Graphite – we have a video showing off some of the powerful visualization features:
When the benchmarks finish the results are stored in the results directory.
Visualizing Results
Reading files of results is hard… especially when the formats differ. We package the scripts for parsing and graphing results in a Python notebook. To interact with the results and graphs run:
$ cd ceph-popper-template/pipelines/
$ ./jupyter.sh
The graphs are in baseline/visualize/visualize.ipynb and if you open that up
you see the parsing code and graphs for the results. The notebook for our
results is rendered by GitHub
here
(but note that GitHub does not make the notebook interactive). We have a
screenshot of the notebook below:

Awesome. Now we can monitor and measure our cluster.
Jekyll theme inspired by researcher
Don't click on this easter egg:
